Our team is committed to exploring
using body as controller
to interact intuitively with the device. The direction we chose was to
use breath to interact. Even though breathing is something people do
in every minute, but we never pay attention to it. But in fact, many
studies have pointed out that consciously and properly breathing will
have a positive effect on our health and wellbeing. So we think our
exploration is meaningful.
The direction I chose is to provide proper breathing training for the
sports crowd. Specifically, I chose jogging as a start for this
project, but in fact it has the potential to promote other sports.
Many studies have pointed out that regular breathing during jogging is
good for health, such as 2:2 breathing, that is, two steps of
exhalation and two steps of inhalation. This can extend the jogger's
exercise time and also improve the effect of exercise. This training
method has also been recognised by many advanced joggers. But in fact,
according to the results of user study, some beginners never heard
about this breathing method. Even for beginners who know this
breathing method, it is difficult for them to concentrate on training.
Therefore, it will be meaningful to make a convenient wearable device
to help beginners to perform breathing training for jogging and get
more from excersice.
Intended Design
Because this design is a wearable device designed to provide breath
training for sports lovers. Therefore, in an ideal state, this design
wants to provide a small device that is as light as possible so that
the user has no obvious sense of wearing. However, this device tries
to provide real-time feedback to users in motion and needs to use
breathing as input. Therefore, a wearable device based on glasses will
be an ideal design.
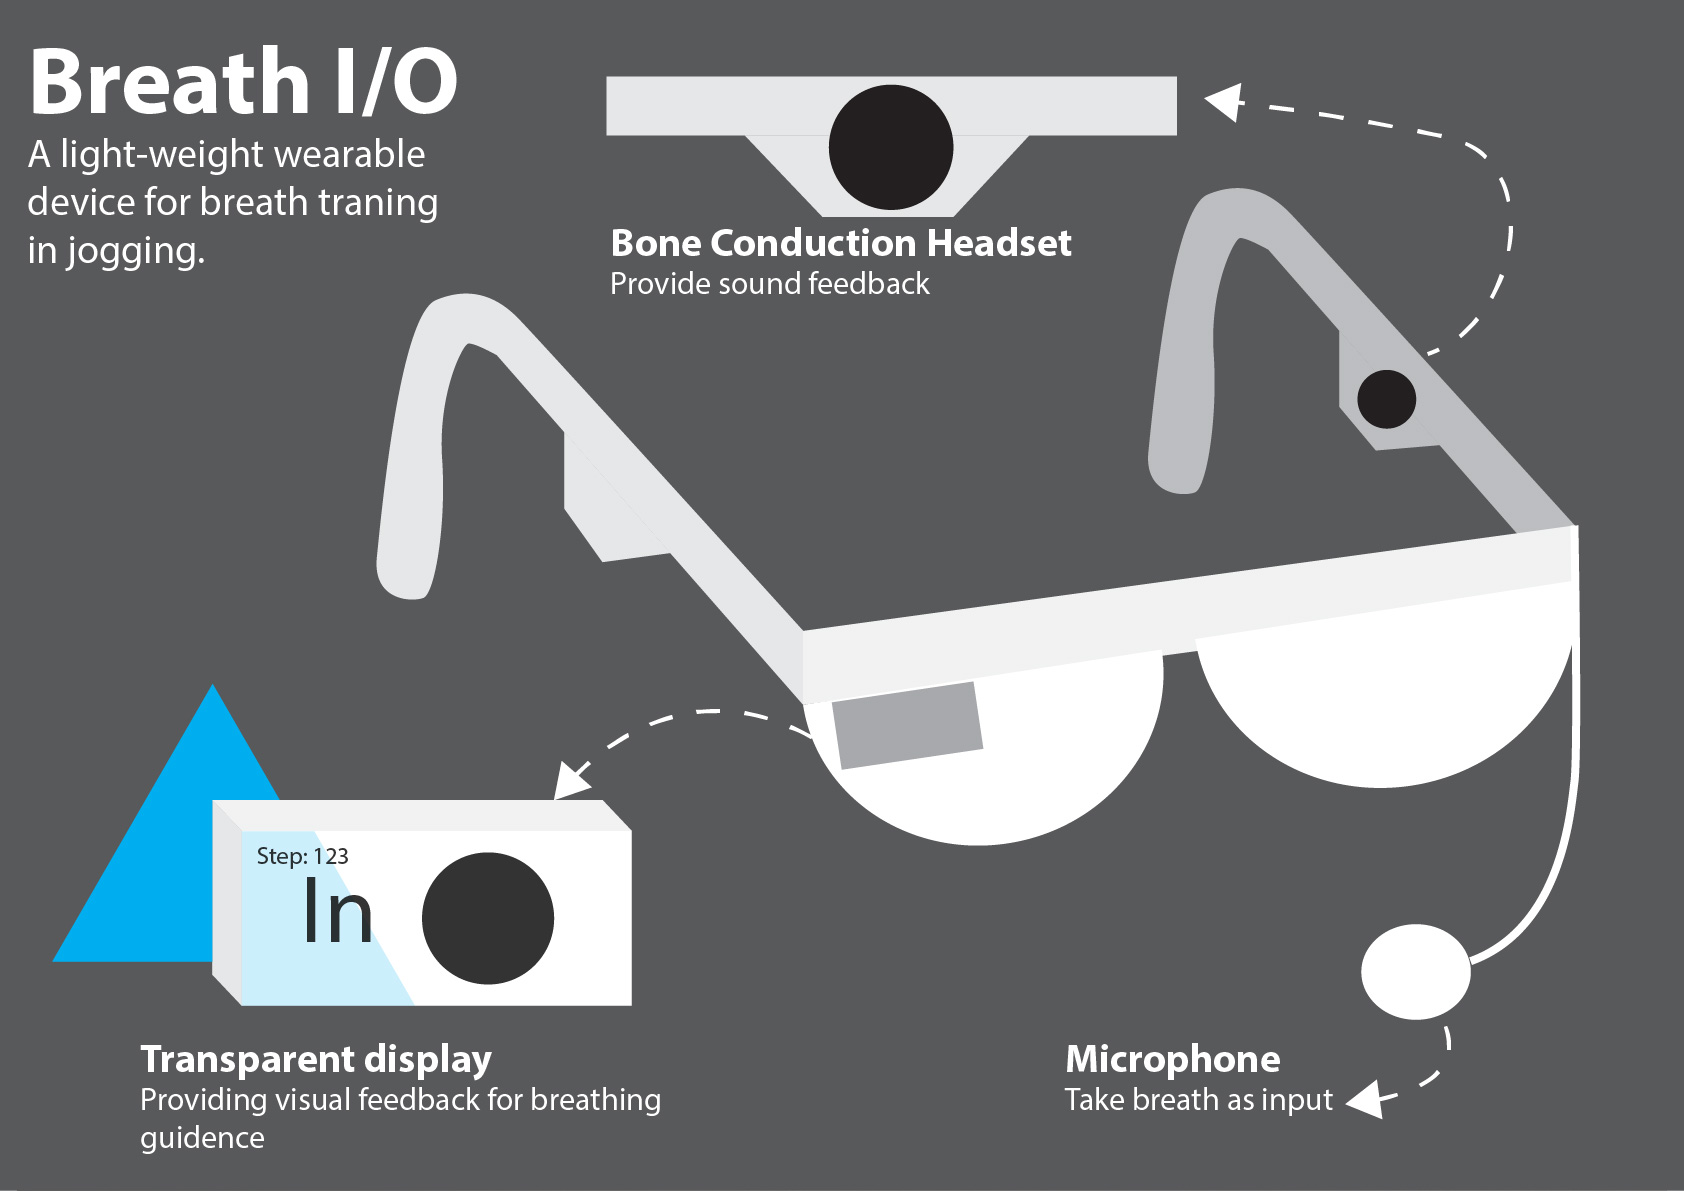
Fig 1. Ideal Design of Concept
If the project has sufficient resources and technology, its ideal
design is shown in the Fig 1. Because sports glasses can be naturally
wearing by users. And the safety factors in sports are also very
critical, so this design uses a
transparent screen and
bone conduction headphones , while providing
feedback while ensuring that athletes can always observe the situation
around them. Key factors such as breathing guidance and step counting
are displayed on the screen. When the user breathes incorrectly, the
indication on the screen will flash and a sound will be emitted from
the earphone for prompting.
Intended Experience
During jogging, users can wear and use the device with little burden,
and they can easily get feedback on the breathing training effect of
the device during jogging. After continuing to use the product for a
period of time, users can learn to use the 2:2 breathing method
naturally to run and get improved sports effects. The user may no
longer need the device for training after using it for a period of
time, but the device can still provide sports performance records and
music companionship during running
Final product and experience of use
Live demo
This is a live demo about the final prototype. In this video you will
see how users will use the final product of the project and some
explanation about about the device.
Justification
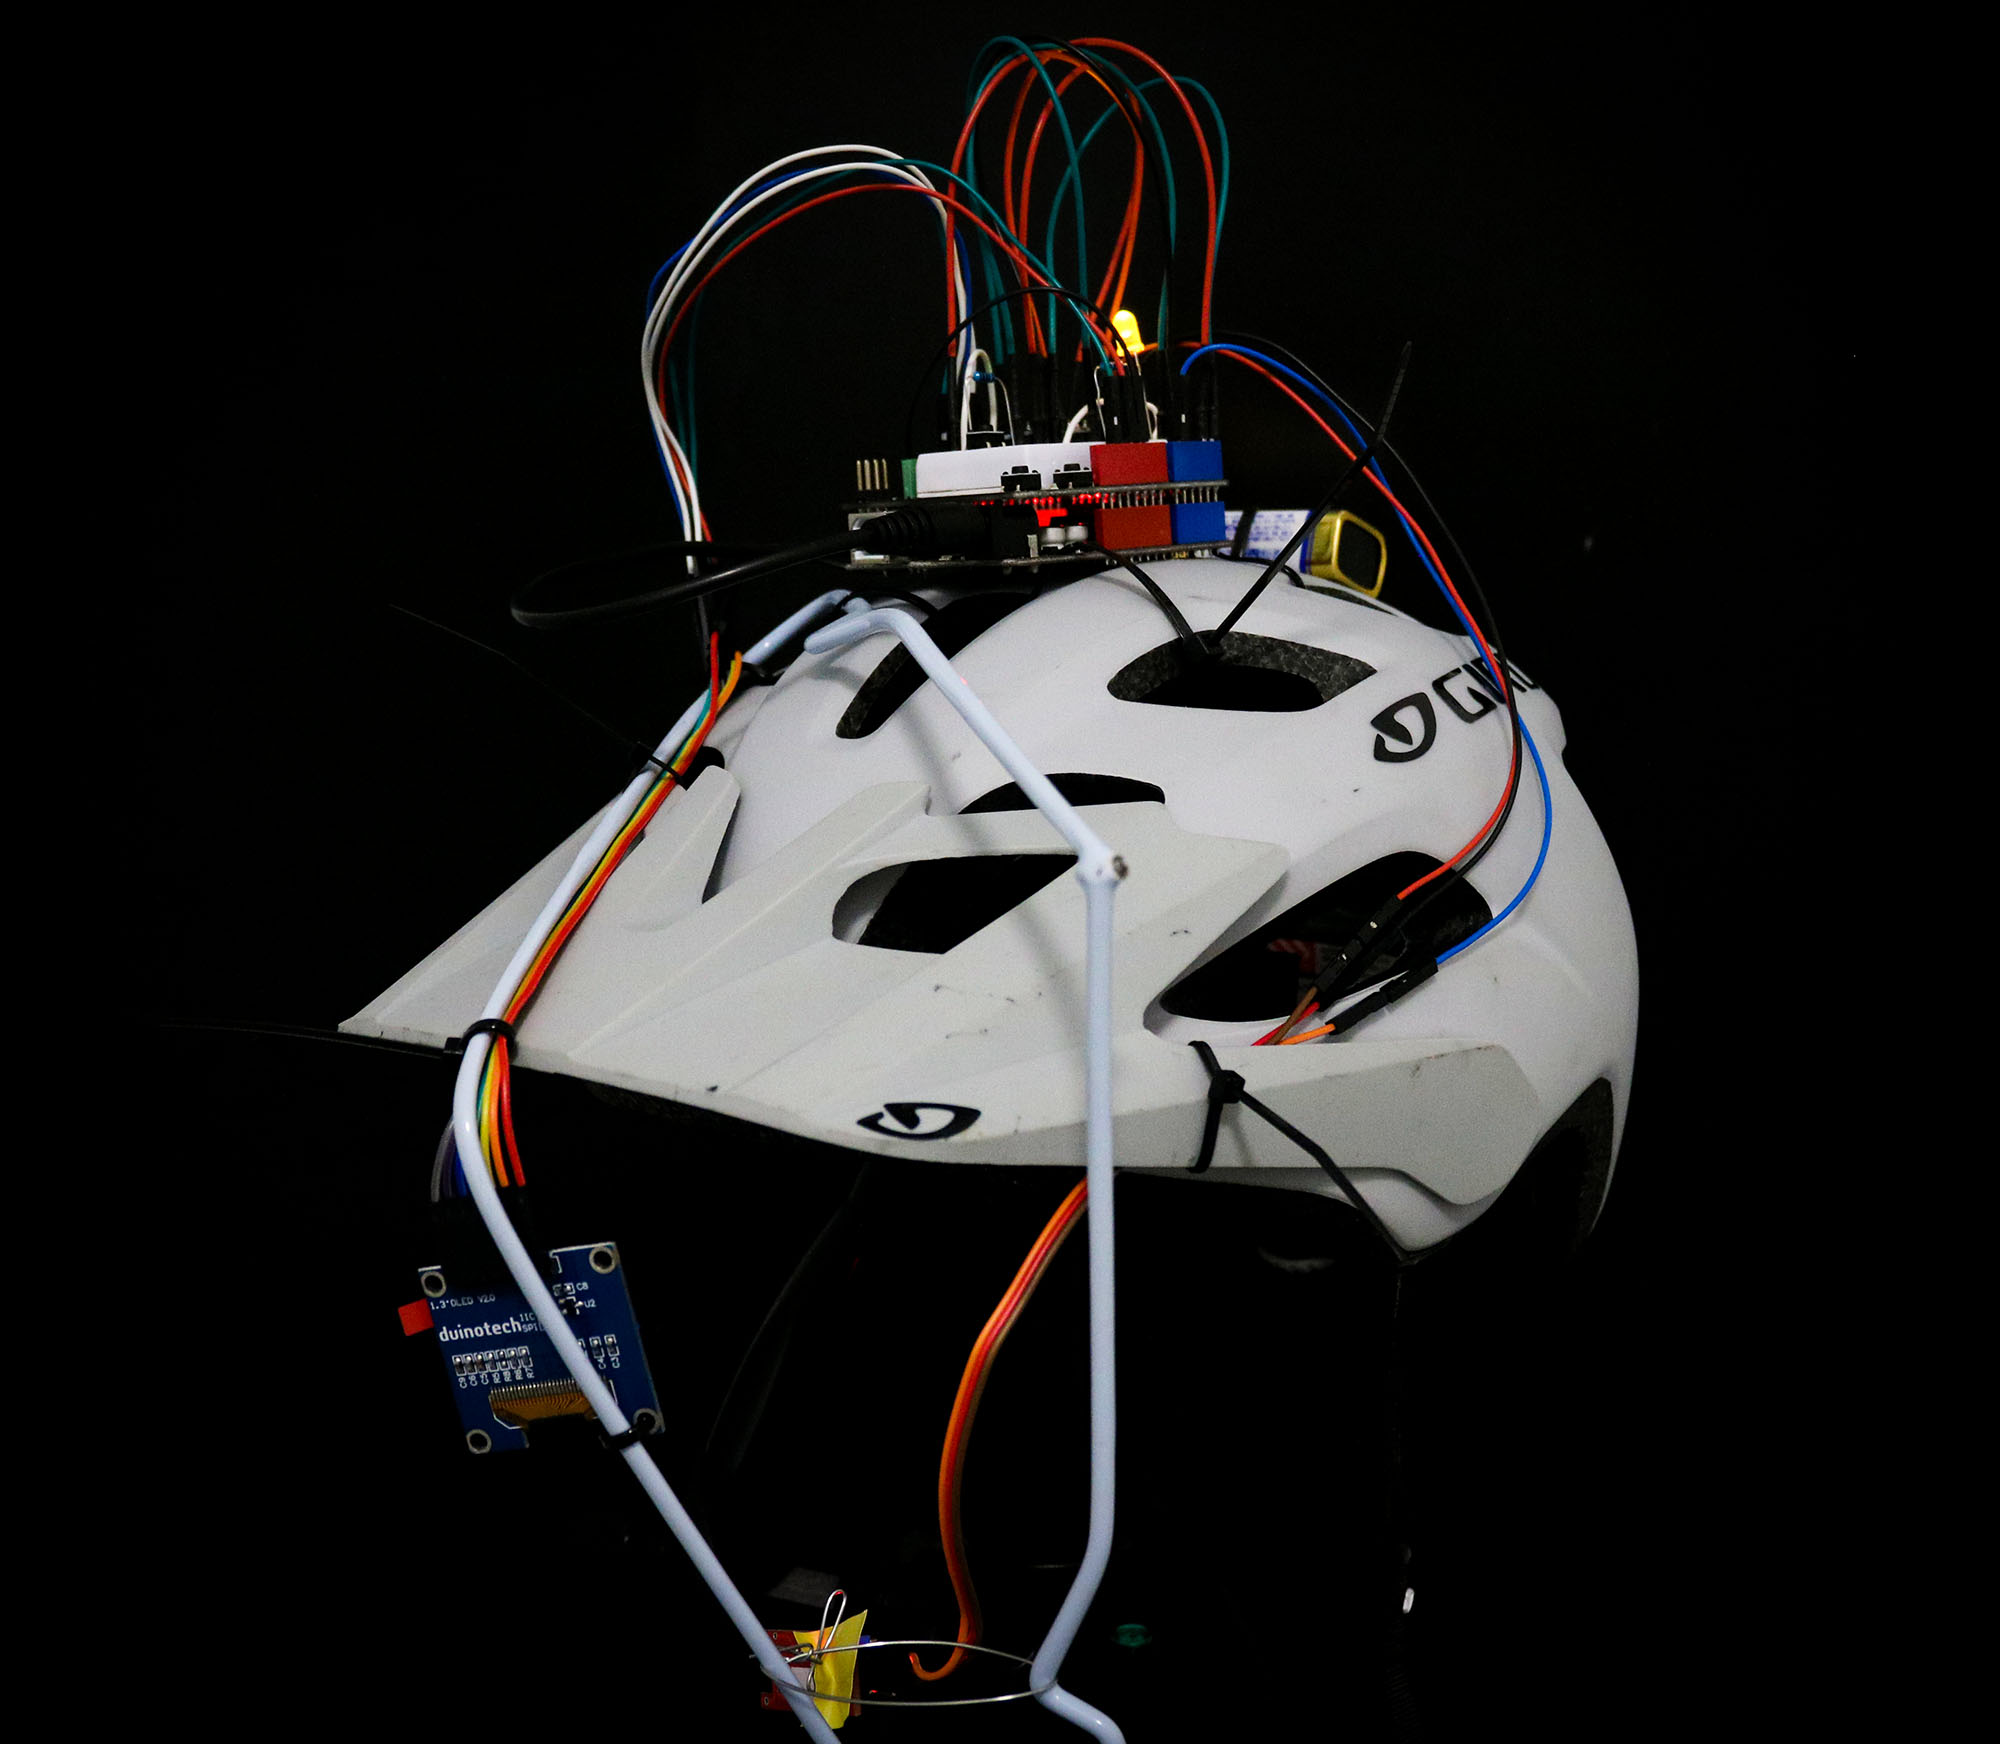
This project uses Arduino as the core to build a set of wearable
devices for breathing training. Considering the size of the Arduino
Uno board and sensors and the requirements for breath detection, I
finally chose to use a helmet to fix the core part and use a 9V
battery for power supply.
Fig 2. Final Prototype
Users will wear the device for 2:2 breathing training during
jogging.When the device is started for a first time, the user will see
a briefly textual tutorial. Due to the limited size of the display,
only simple instructions have been made to reduce the reading
pressure. After starting, the user can exercise according to the
pattern displayed on the helmet. After the users use this device to
breathing training for a period of time, with the training guid1 of
the helmet, users can master the 2:2 breathing method and improve
their own exercise effect.
Function and simulation
This prototype basically achieved the key functions from the ideal
project design. The device uses Arduino as the core processor, uses an
accelerometer to collect the user's movement and calculate the number
of steps, and uses a microphone as a breathing sensor to collect the
user's breathing sound. The feedback uses a small monochrome display
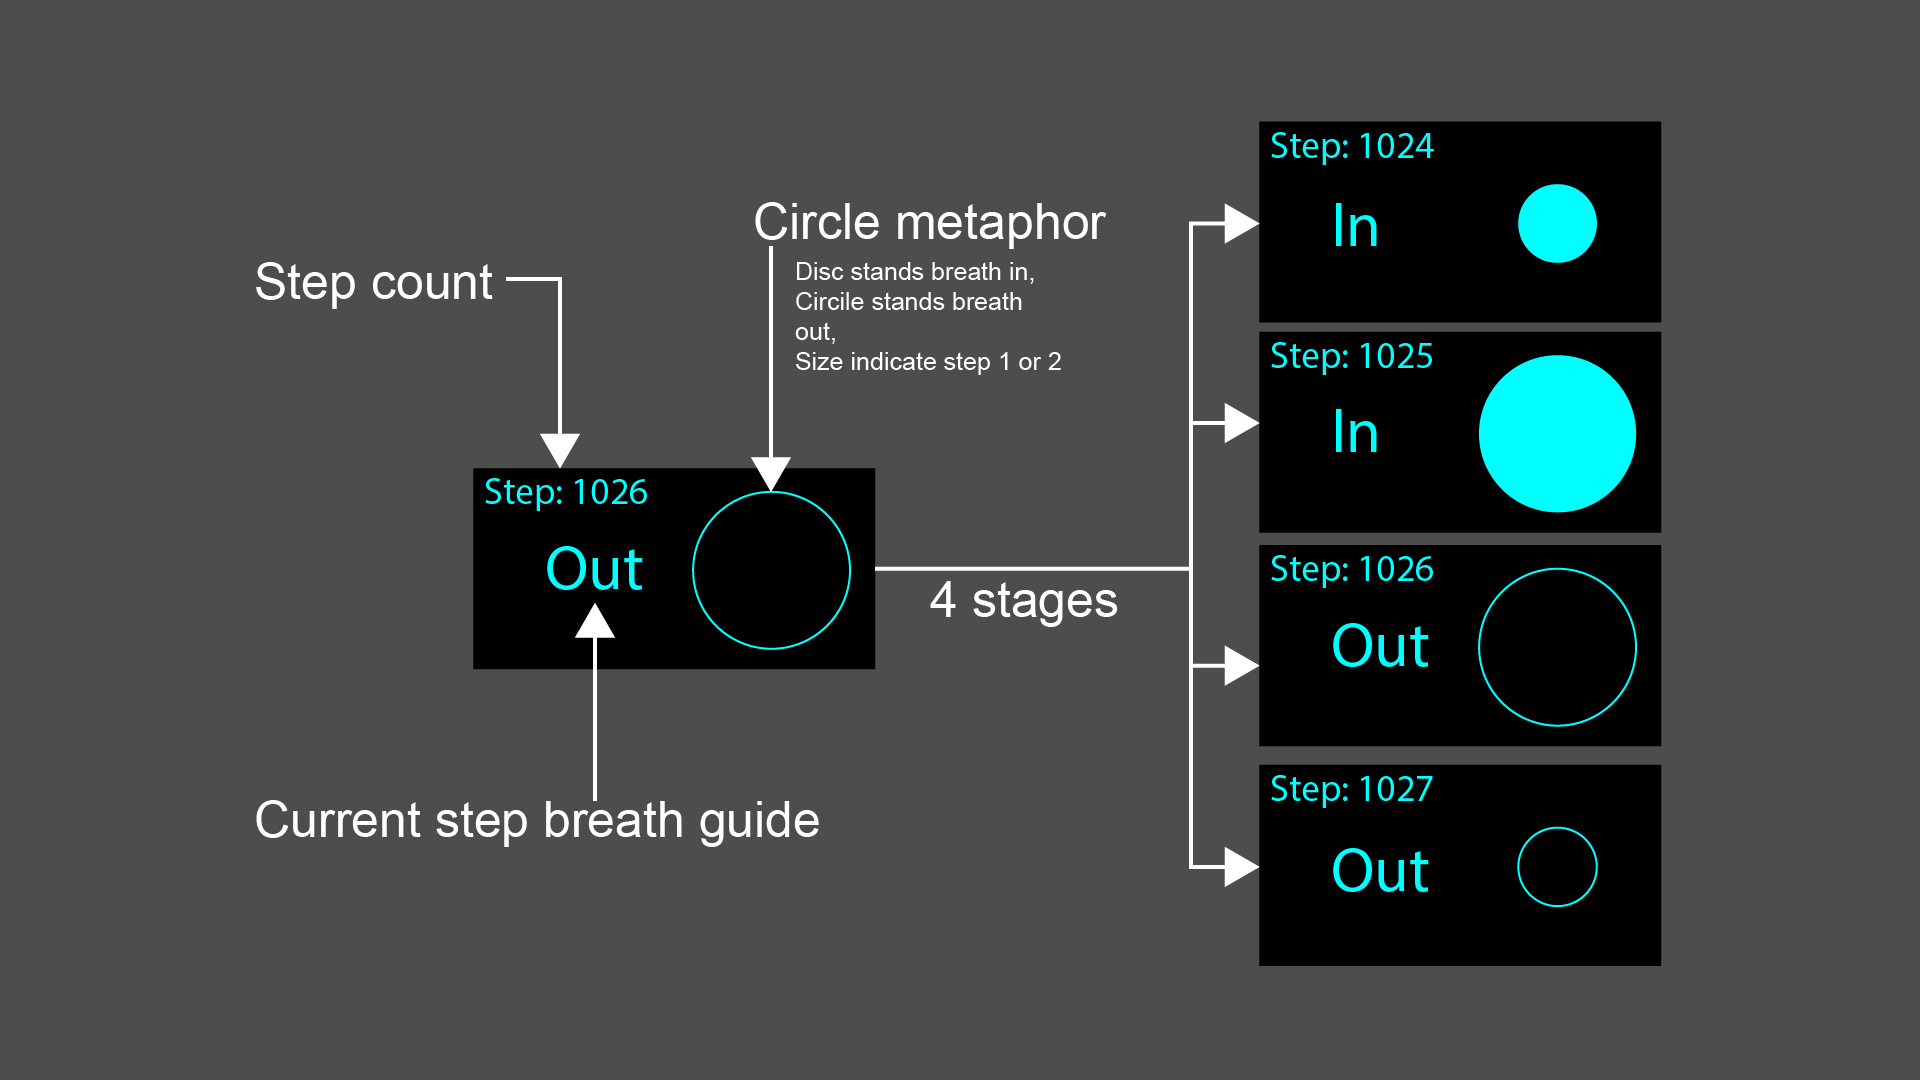
with a specially designed UI for visual feedback(Fig 3).
When designing the UI, we took the feedback from evaluation the user's
shaking and attention during movement will not be concentrated on the
display, so we re-designed our UI with larger fonts, simpler graphics
and less content presented on a single screen. But we still try our
best to ensure that the UI we present is easy to understand and can
provide users with the next breath prediction capability. Only when
users read the tutorial, they are relatively still and have more
content, so we used smaller fonts.
The circle in the UI uses a metaphor to connect the empty circle to
exhalation, and the solid disc to inhale, which is more intuitive.
Fig 3. UI design
Limited by the technology of our group, the device has been simulated
for a part of the experience. Because the device itself has no storage
capacity, the tutorial will appear every time the power is turned on
for the first time. Because this device uses a microphone to detect
breathing, taking into account environmental noise and other effects,
its accuracy can only respond to exhalation and cannot identify
whether the user is inhaling. But we assume that the user will not
hold his breath during exercise, so we think that the user is inhaling
when the user is not exhaling.
Another disadvantage of this prototype is that at the beginning of the
design we wanted to use a transparent screen and use a lens to focus
the UI at a distance for the convenience of the eye focusing. However,
limited by cost and technology, this idea has not been implemented.
The other is the design using acoustic feedback, which is limited by
time and cannot be implemented.
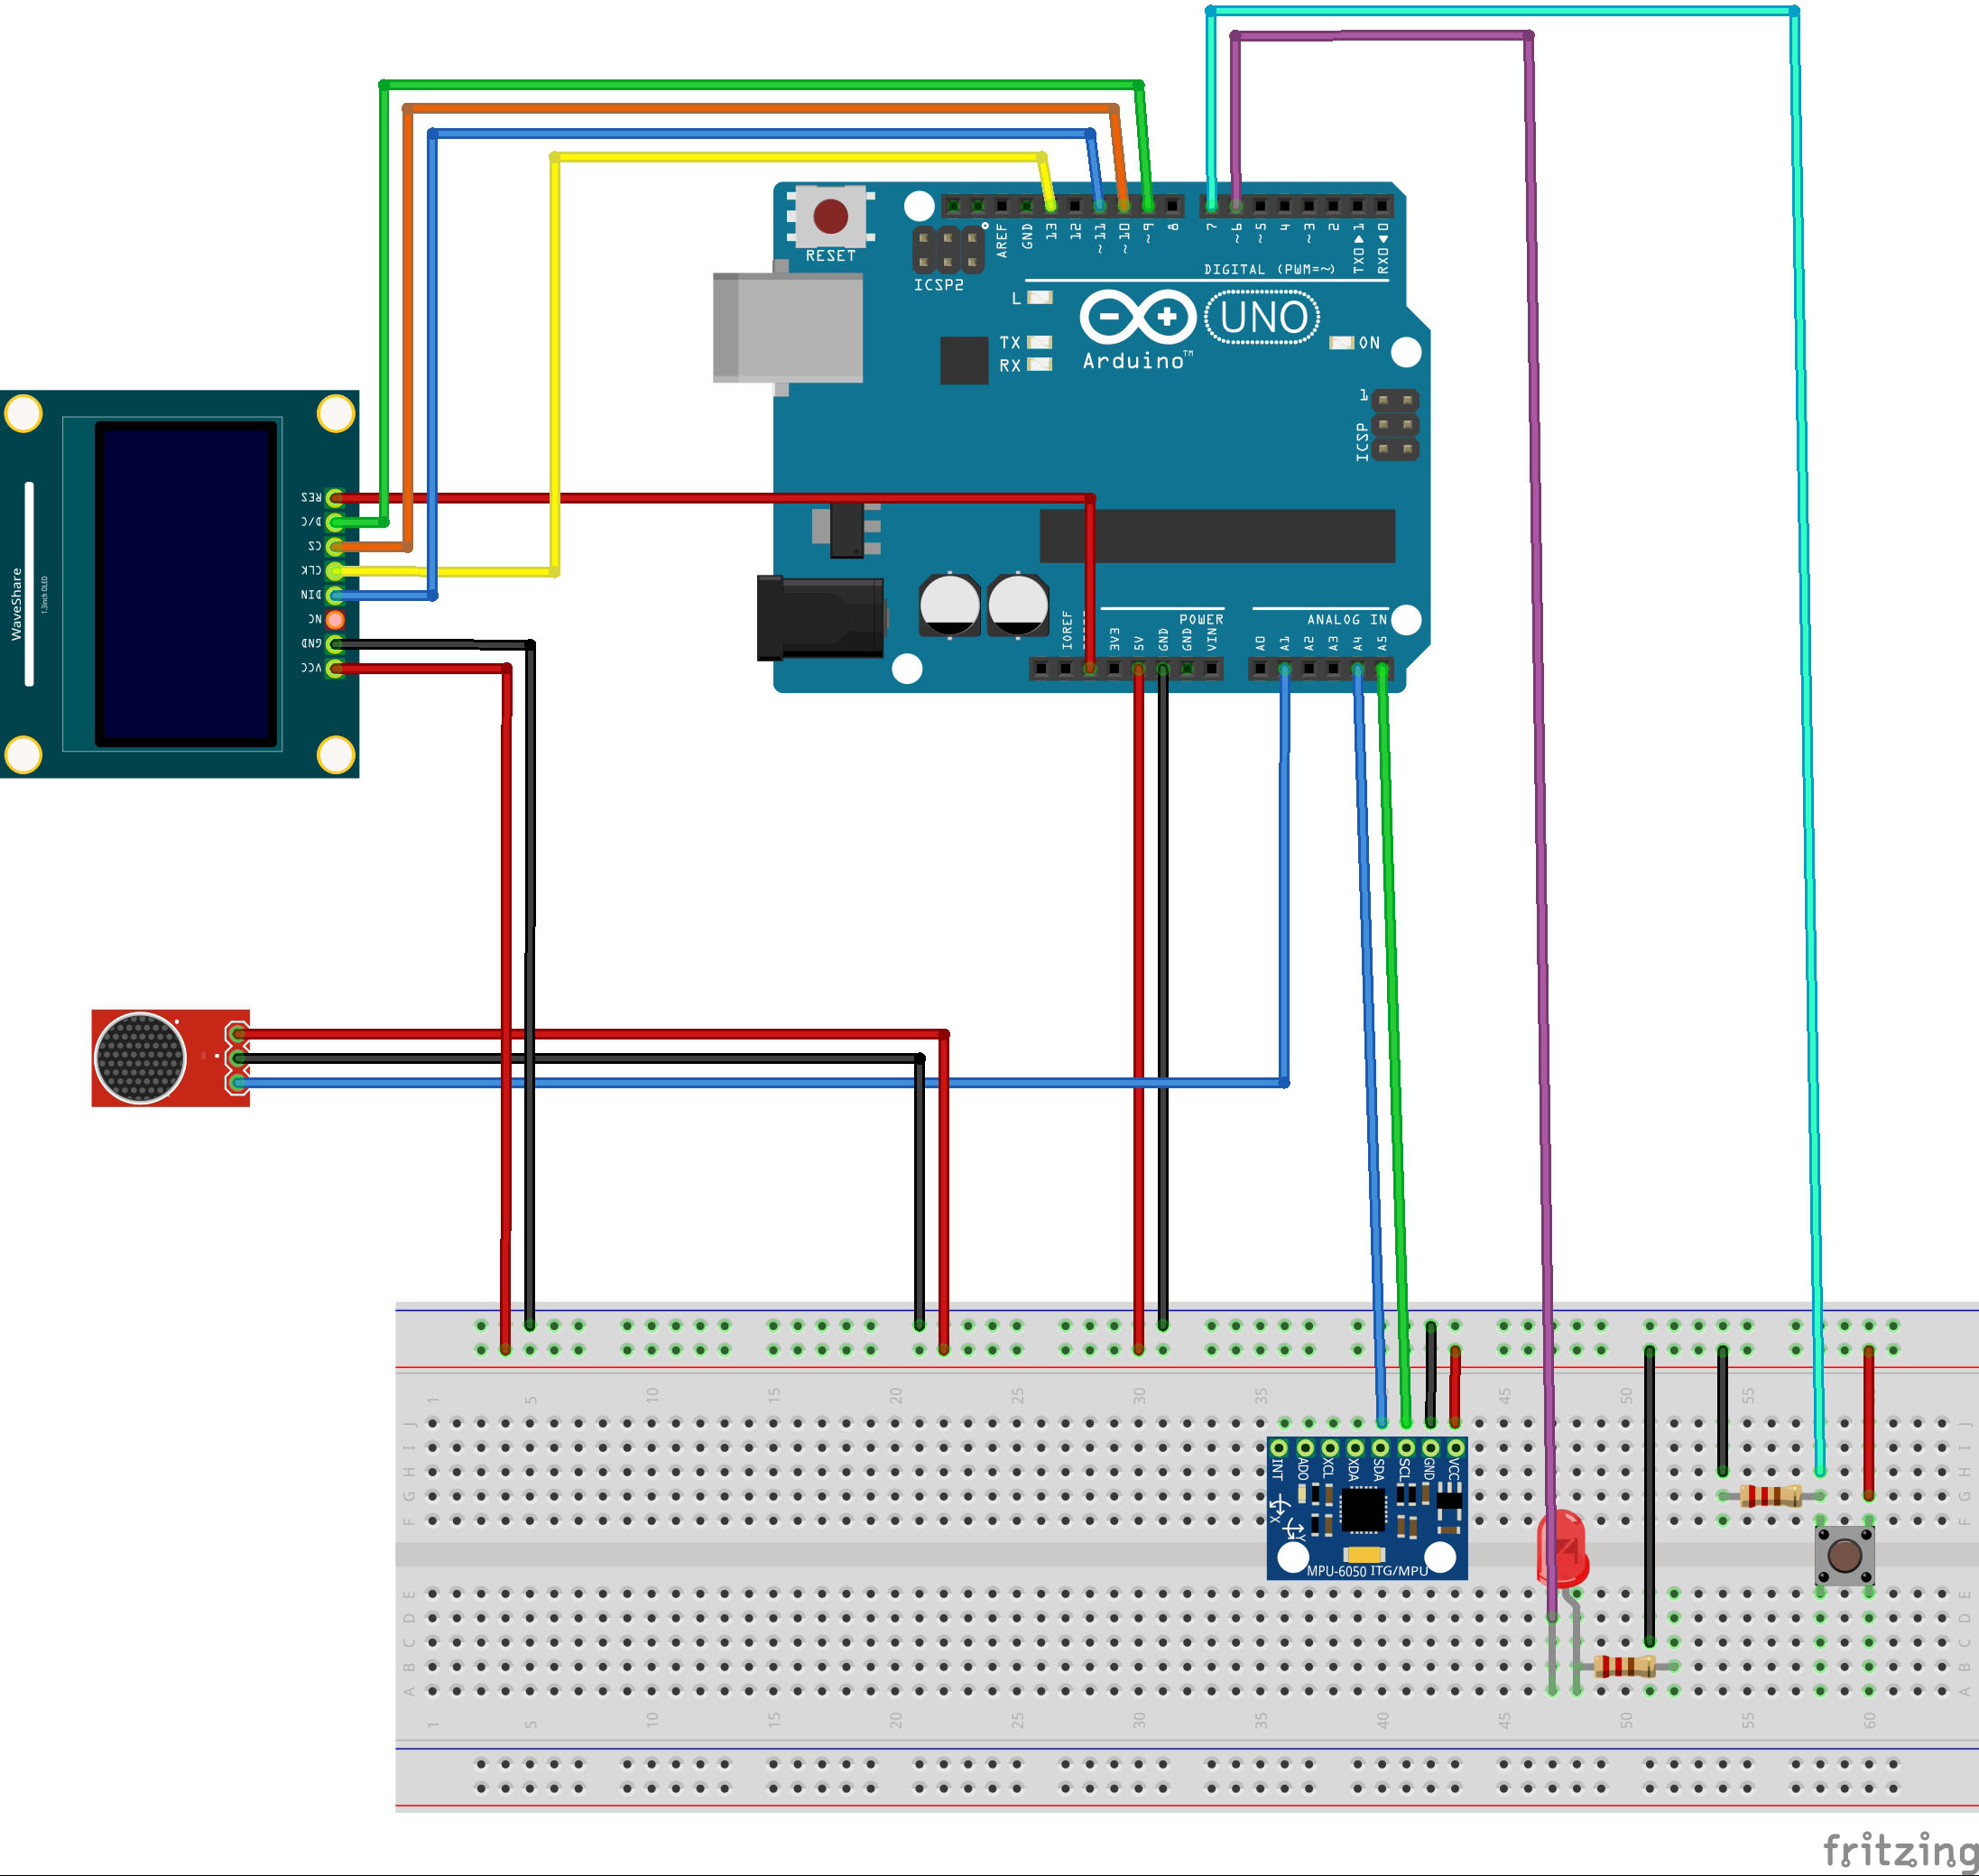
The core processor of this device is an Arduino Uno board, powered by
a 9V battery. Breathing signal input adopts XC-4438 microphone to
collect sound loudness, and the result is input to Arduino as analog
signal. Steps collection uses GY-521 accelerometer for motion data
collection, using the same I2C signal input method as the MPU-6050,
which mainly collects acceleration changes on the z-axis and converts
them into steps. The visual feedback uses the XC-3728 1.3 inch
monochrome 64x128 display screen, which is controlled by u8glib. The
display screen and microphone are hung in front of the user using a
hanger. In order to facilitate the focusing of the user's glasses as
far as possible from the user's eyes, the microphone is fixed with
iron wire, and the user can adjust its position. We use a button to
switch between rest and exercise mode. In addition, we still use an
LED as the work indicator, the LED light will be on when the device
enters the sports link. the circuit diagram is showing in figure 4.
Fig 4. Circuit diagram
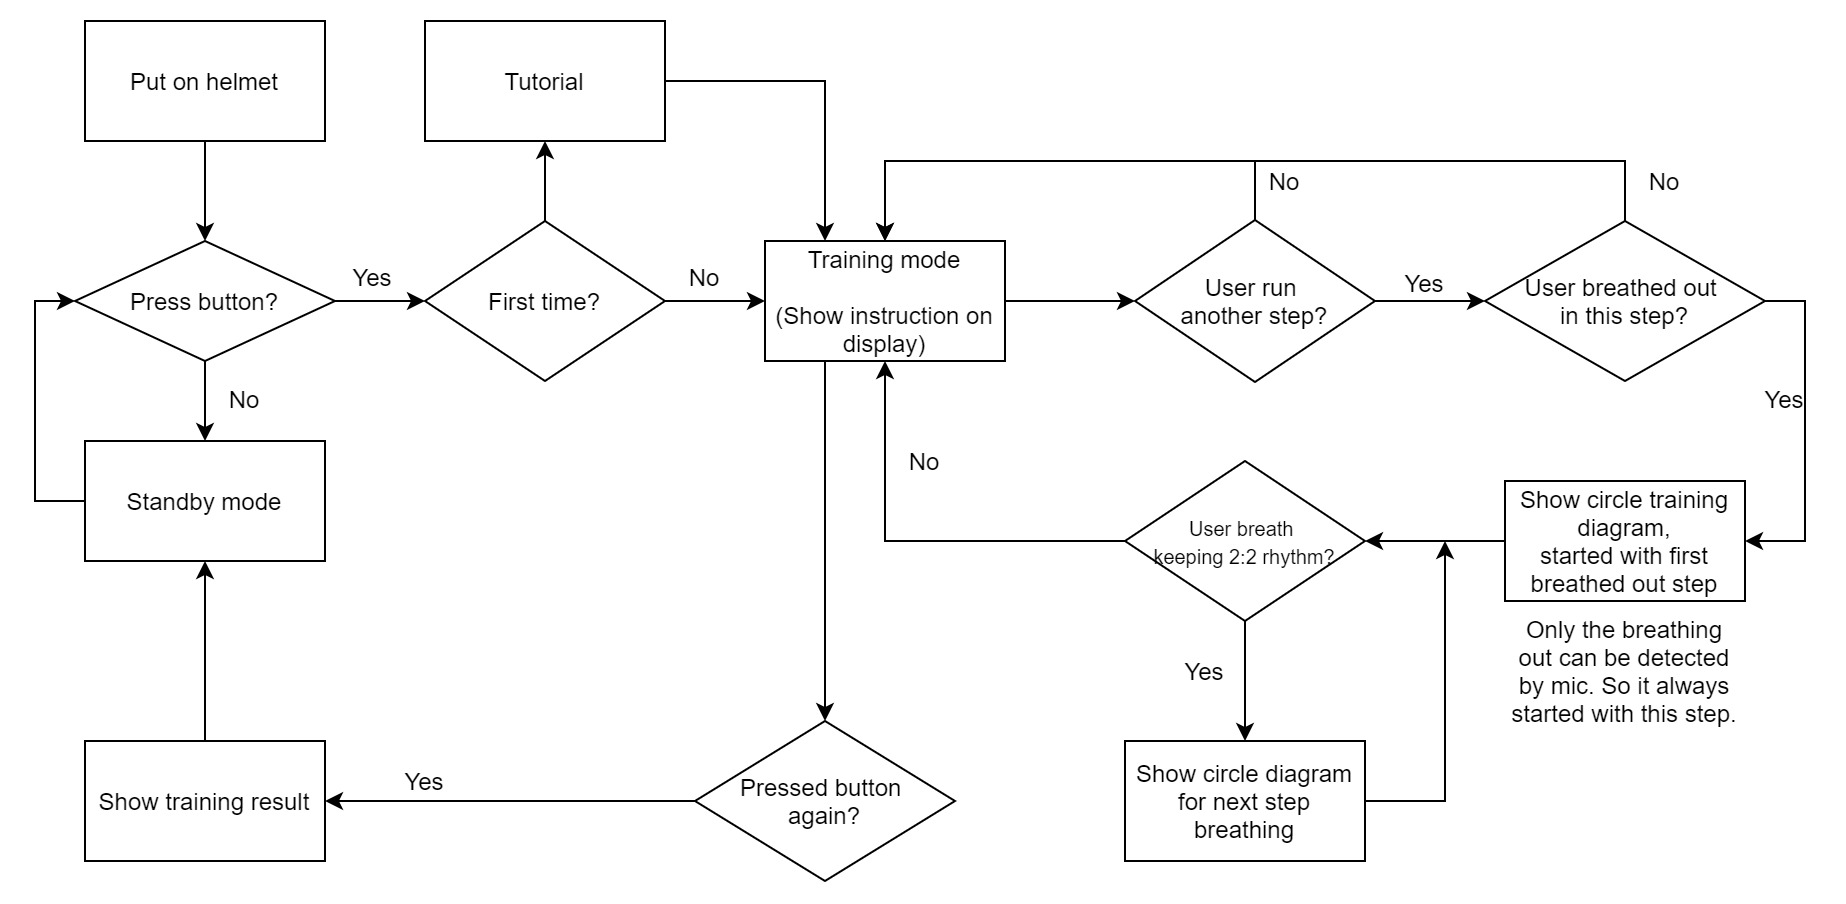
Software
The following figure is the interaction process on the device software
and the algorithm behind it.
Fig 5. Interaction Flow
The code of the training mode is shown below.
  /* Main loop of traning mode */
  void doSporting() {
    digitalWrite(lightOut, HIGH);

    int phase; // 2 breath out, 2 breath in, 4 phases in total.

    // detect step
    bool isMoving = getPace();
    if (isMoving) {
      count++;

      // verify last step's breath when firstly entering the new step
      if (!breathedRight && hasBreathed) { // restart a new loop when re-breathed
        breathedRight = true;
        startStep = count;
      }
      // normal verify
      phase = (count - startStep) % 4;
      lastPhaseBreathed = hasBreathed;
      hasBreathed = false;
      verifyBreath(phase, lastPhaseBreathed);
    } else {
      phase = (count - startStep) % 4;
    }

    // render display content
    draw(phase, breathedRight);

    // after verify, detect breath for this step again.
    bool isBreathing = getIsBreathing();
    if (isBreathing) {
      hasBreathed = true;
    }
  }
Below is a function for detecting breathing, and the loudness of
breathing sound is input in the form of an analog value. In order to
mitigate the negative effects caused by noise and extreme values, we
used median filtering in it, collecting data 100 times each time and
sorting the array using bubble sort, and averaging the 49th and 50th
data in the middle to obtain Median, so as to obtain relatively
reliable values. The data collection function of the accelerometer is
similar to breath detecting. Median filtering is used to obtain more
stable values and mainly z-axis value is used.
  /* Using breath sound to detect breathing state */
  bool getIsBreathing()
  {
    int arr[100];
    int sum = 0;
    for (int i = 0; i < 100; i++)
    {
      arr[i] = analogRead(soundPin);
    }
    sort(arr);

    sum = (arr[49]+arr[50])/2;

    if (sum > 100) { //baseline is 70, with 30 buffer
      return true;

    }
    return false;
  }
  /* bubble sort */
  void sort(int myArr[])
  {
    // get array lenth: total-byte-lenth / first-element-byte-lenth
    int len = sizeof(myArr) / sizeof(myArr[0]);

    for (int i = 0; i < len - 1; i++) // bubble sort
    {
      for (int j = 0; j < len - i - 1; j++)
      {
        if (myArr[j] > myArr[j + 1])
        {
          int temp = myArr[j];
          myArr[j] = myArr[j + 1];
          myArr[j + 1] = temp;
        }
      }
    }
  }
The functions of UI drawing are more repetitive and simple, and mainly
use u8glib to
illustrate, so they are not shown here.